An Introduction to the Linux
An Introduction to the Linux Terminal
  Introduction
This tutorial, which is the first in a series that teaches Linux basics to get new users on their feet, covers getting started with the terminal, the Linux command line, and executing commands.
If you are new to Linux, you will want to familiarize yourself with the terminal, as it is the standard way to interact with a Linux server.
Using the command line may seem like a daunting task but it is actually very easy if you start with the basics, and build your skills from there.

If you would like to get the most out of this tutorial, you will need a Linux server to connect to and use.
If you do not already have one, you can quickly spin one up by following this link: How To Create A DigitalOcean Droplet.
This tutorial is based on an Ubuntu 14.04 server but the general principles apply to any other distribution of Linux.

Let's get started by going over what a terminal emulator is.

   Terminal Emulator
A terminal emulator is a program that allows the use of the terminal in a graphical environment.
As most people use an OS with a graphical user interface (GUI) for their day-to-day computer needs, the use of a terminal emulator is a necessity for most Linux server users.

Here are some free, commonly-used terminal emulators by operating system:
- Mac OS X: Terminal (default), iTerm 2
- Windows: PuTTY
- Linux: Terminal, KDE Konsole, XTerm
Each terminal emulator has its own set of features, but all of the listed ones work great and are easy to use.
The Shell
In a Linux system, the shell is a command-line interface that interprets a user's commands and script files, and tells the server's operating system what to do with them.
There are several shells that are widely used, such as Bourne shell (sh) and C shell (csh).
Each shell has its own feature set and intricacies, regarding how commands are interpreted, but they all feature input and output redirection, variables, and condition-testing, among other things.
This tutorial was written using the Bourne-Again shell, usually referred to as bash, which is the default shell for most Linux distributions, including Ubuntu, CentOS, and RedHat.
The Command Prompt
When you first login to a server, you will typically be greeted by the Message of the Day (MOTD), which is typically an informational message that includes miscellaneous information such as the version of the Linux distribution that the server is running.
After the MOTD, you will be dropped into the command prompt, or shell prompt, which is where you can issue commands to the server.
The information that is presented at the command prompt can be customized by the user, but here is an example of the default Ubuntu 14.04 command prompt:
sammy@webapp:~$
Here is a breakdown of the composition of the command prompt:
- sammy: The username of the current user
- webapp: The hostname of the server
- ~: The current directory.
In bash, which is the default shell, the ~, or tilde, is a special character that expands to the path of the current user's home directory; in this case, it represents /home/sammy
- $: The prompt symbol.
This denotes the end of the command prompt, after which the user's keyboard input will appear
Here is an example of what the command prompt might look like, if logged in as root and in the /var/log directory:
root@webapp:/var/log#
Note that the symbol that ends the command prompt is a #, which is the standard prompt symbol for root.
In Linux, the root user is the superuser account, which is a special user account that can perform system-wide administrative functions–it is an unrestricted user that has permission to perform any task on a server.
Executing Commands
Commands can be issued at the command prompt by specifying the name of an executable file, which can be a binary program or a script.
There are many standard Linux commands and utilities that are installed with the OS, that allow you navigate the file system, install and software packages, and configure the system and applications.
An instance of a running command is known as a process.
When a command is executed in the foreground, which is the default way that commands are executed, the user must wait for the process to finish before being returned to the command prompt, at which point they can continue issuing more commands.
It is important to note that almost everything in Linux is case-sensitive, including file and directory names, commands, arguments, and options.
If something is not working as expected, double-check the spelling and case of your commands!
We will run through a few examples that will cover the basics of executing commands.
Note: If you're not already connected to a Linux server, now is a good time to log in.
If you have a Linux server but are having trouble connecting, follow this link: How to Connect to Your Droplet with SSH.
Without Arguments or Options
To execute a command without any arguments or options, simply type in the name of the command and hit RETURN.
If you run a command like this, it will exhibit its default behavior, which varies from command to command.
For example, if you run the cd command without any arguments, you will be returned to your current user's home directory.
The ls command will print a listing of the current directory's files and directories.
The ip command without any arguments will print a message that shows you how to use the ip command.
Try running the ls command with no arguments to list the files and directories in your current directory (there may be none):
ls
With Arguments
Many commands accept arguments, or parameters, which can affect the behavior of a command.
For example, the most common way to use the cd command is to pass it a single argument that specifies which directory to change to.
For example, to change to the /usr/bin directory, where many standard commands are installed, you would issue this command:
cd /usr/bin
The cd component is the command, and the first argument /usr/bin follows the command.
Note how your command prompt's current path has updated.
If you would like, try running the ls command to see the files that are in your new current directory.
ls
With Options
Most commands accept options, also known as flags or switches, that modify the behavior of the command.
As they are special arguments, options follow a command, and are indicated by a single - character followed by one or more options, which are represented by individual upper- or lower-case letters.
Additionally, some options start with --, followed by a single, multi-character (usually a descriptive word) option.
For a basic example of how options work, let's look at the ls command.
Here are a couple of common options that come in handy when using ls:
- -l: print a “long listing”, which includes extra details such as permissions, ownership, file sizes, and timestamps
- -a: list all of a directory's files, including hidden ones (that start with .)
To use the -l flag with ls, use this command:
ls -l
Note that the listing includes the same files as before, but with additional information about each file.
As mentioned earlier, options can often be grouped together.
If you want to use the -l and -a option together, you could run ls -l -a, or just combine them like in this command:
ls -la
Note that the listing includes the hidden . and .. directories in the listing, because of the -a option.
With Options and Arguments
Options and arguments can almost always be combined, when running commands.
For example, you could check the contents of /home, regardless of your current directory, by running this ls command:
ls -la /home
ls is the command, -la are the options, and /home is the argument that indicates which file or directory to list.
This should print a detailed listing of the /home directory, which should contain the home directories of all of the normal users on the server.
Environment Variables
Environment variables are named values that are used to change how commands and processes are executed.
When you first log in to a server, several environment variables will be set according to a few configuration files by default.
View All Environment Variables
To view all of the environment variables that are set for a particular terminal session, run the env command:
env
There will likely be a lot of output, but try and look for PATH entry:
PATH=/usr/local/sbin:/usr/local/bin:/usr/sbin:/usr/bin:/sbin:/bin:/usr/games:/usr/local/games
The PATH environment variable is a colon-delimited list of directories where the shell will look for executable programs or scripts when a command is issued.
For example, the env command is located in /usr/bin, and we are able to execute it without specifying its fully-qualified location because its path is in the PATH environment variable.
View the Value of a Variable
The value of an environment variable can be retrieved by prefixing the variable name with a $.
Doing so will expand the referenced variable to its value.
For example, to print out the value of the PATH variable, you may use the echo command:
echo $PATH
Or you could use the HOME variable, which is set to your user's home directory by default, to change to your home directory like this:
cd $HOME
If you try to access an environment variable that hasn't been set, it will be expanded to nothing; an empty string.
Setting Environment Variables
Now that you know how to view your environment variables, you should learn how to set them.
To set an environment variable, all you need to do is start with a variable name, followed immediately by an = sign, followed immediately by its desired value:
VAR=value
Note that if you set an existing variable, the original value will be overwritten.
If the variable did not exist in the first place, it will be created.
Bash includes a command called export which exports a variable so it will be inherited by child processes.
In simple terms, this allows you to use scripts that reference an exported environment variable from your current session.
If you're still unclear on what this means, don't worry about it for now.
You can also reference existing variables when setting a variable.
For example, if you installed an application to /opt/app/bin, you could add that directory to the end of your PATH environment variable with this command:
export PATH=$PATH:/opt/app/bin
Now verify that /opt/app/bin has been added to the end of your PATH variable with echo:
echo $PATH
Keep in mind that setting environment variables in this way only sets them for your current session.
This means if you log out or otherwise change to another session, the changes you made to the environment will not be preserved.
There is a way to permanently change environment variables, but this will be covered in a later tutorial.
Conclusion
Now that you have learned about the basics of the Linux terminal (and a few commands), you should have a good foundation for expanding your knowledge of Linux commands.
Read the next tutorial in this series to learn how to navigate, view, and edit files and their permissions.
Basic Linux Navigation and File Management
Introduction
If you do not have much experience working with Linux systems, you may be overwhelmed by the prospect of controlling an operating system from the command line.
In this guide, we will attempt to get you up to speed with the basics.
This guide will not cover everything you need to know to effectively use a Linux system.
However, it should give you a good jumping-off point for future exploration.
This guide will give you the bare minimum you need to know before moving on to other guides.
Prerequisites and Goals
In order to follow along with this guide, you will need to have access to a Linux server.
If you need information about connecting to your server for the first time, you can follow our guide on connecting to a Linux server using SSH.
You will also want to have a basic understanding of how the terminal works and what Linux commands look like.
This guide covers terminal basics, so you should check it out if you are new to using terminals.
All of the material in this guide can be accomplished with a regular, non-root (non-administrative) user account.
You can learn how to configure this type of user account by following your distribution's initial server setup guide (Ubuntu 14.04, CentOS 7).
When you are ready to begin, connect to your Linux server using SSH and continue below.
Navigation and Exploration
The most fundamental skills you need to master are moving around the filesystem and getting an idea of what is around you.
We will discuss the tools that allow you to do this in this section.
Finding Where You Are with the “pwd” Command
When you log into your server, you are typically dropped into your user account's home directory.
A home directory is a directory set aside for your user to store files and create directories.
It is the location in the filesystem where you have full dominion.
To find out where your home directory is in relationship to the rest of the filesystem, you can use the pwd command.
This command displays the directory that we are currently in:
pwd
You should get back some information that looks like this:
/home/demo
The home directory is named after the user account, so the above example is what the value would be if you were logged into the server with an account called demo.
This directory is within a directory called /home, which is itself within the top-level directory, which is called “root” but represented by a single slash “/”.
Looking at the Contents of Directories with “ls”
Now that you know how to display the directory that you are in, we can show you how to look at the contents of a directory.
Currently, your home directory that we saw above does not have much to see, so we will go to another, more populated directory to explore.
Type the following in your terminal to move to this directory (we will explain the details of moving directories in the next section).
Afterward, we'll use pwd to confirm that we successfully moved:
cd /usr/share
pwd
/usr/share
Now that we are in a new directory, let's look at what's inside.
To do this, we can use the ls command:
ls
adduser groff pam-configs
applications grub perl
apport grub-gfxpayload-lists perl5
apps hal pixmaps
apt i18n pkgconfig
aptitude icons polkit-1
apt-xapian-index info popularity-contest
.
.
.
As you can see, there are many items in this directory.
We can add some optional flags to the command to modify the default behavior.
For instance, to list all of the contents in an extended form, we can use the -l flag (for “long” output):
ls -l
total 440
drwxr-xr-x 2 root root 4096 Apr 17 2014 adduser
drwxr-xr-x 2 root root 4096 Sep 24 19:11 applications
drwxr-xr-x 6 root root 4096 Oct 9 18:16 apport
drwxr-xr-x 3 root root 4096 Apr 17 2014 apps
drwxr-xr-x 2 root root 4096 Oct 9 18:15 apt
drwxr-xr-x 2 root root 4096 Apr 17 2014 aptitude
drwxr-xr-x 4 root root 4096 Apr 17 2014 apt-xapian-index
drwxr-xr-x 2 root root 4096 Apr 17 2014 awk
.
.
.
This view gives us plenty of information, most of which looks rather unusual.
The first block describes the file type (if the first column is a “d” the item is a directory, if it is a “-”, it is a normal file) and permissions.
Each subsequent column, separated by white space, describes the number of hard links, the owner, group owner, item size, last modification time, and the name of the item.
We will describe some of these at another time, but for now, just know that you can view this information with the -l flag of ls.
To get a listing of all files, including hidden files and directories, you can add the -a flag.
Since there are no real hidden files in the /usr/share directory, let's go back to our home directory and try that command.
You can get back to the home directory by typing cd with no arguments:
cd
ls -a
.
..
.bash_logout .bashrc .profile
As you can see, there are three hidden files in this demonstration, along with . and .., which are special indicators.
You will find that often, configuration files are stored as hidden files, as is the case here.
For the dot and double dot entries, these aren't exactly directories as much as built-in methods of referring to related directories.
The single dot indicates the current directory, and the double dot indicates this directory's parent directory.
This will come in handy in the next section.
Moving Around the Filesystem with “cd”
We have already made two directory moves in order to demonstrate some properties of ls in the last section.
Let's take a better look at the command here.
Begin by going back to the /usr/share directory by typing this:
cd /usr/share
This is an example of changing a directory by giving an absolute path.
In Linux, every file and directory is under the top-most directory, which is called the “root” directory, but referred to by a single leading slash “/”.
An absolute path indicates the location of a directory in relation to this top-level directory.
This lets us refer to directories in an unambiguous way from any place in the filesystem.
Every absolute path must begin with a slash.
The alternative is to use relative paths.
Relative paths refer to directories in relation to the current directory.
For directories close to the current directory in the hierarchy, this is usually easier and shorter.
Any directory within the current directory can be referenced by name without a leading slash.
We can change to the locale directory within /usr/share from our current location by typing:
cd locale
We can likewise move multiple directory levels with relative paths by providing the portion of the path that comes after the current directory's path.
From here, we can get to the LC_MESSAGES directory within the en directory by typing:
cd en/LC_MESSAGES
To go back up, travelling to the parent of the current directory, we use the special double dot indicator we talked about earlier.
For instance, we are now in the /usr/share/locale/en/LC_MESSAGES directory.
To move up one level, we can type:
cd ..
This takes us to the /usr/share/locale/en directory.
A shortcut that you saw earlier that will always take you back to your home directory is to use cd without providing a directory:
cd
pwd
/home/demo
To learn more about how to use these three commands, you can check out our guide on exploring the Linux filesystem.
Viewing Files
In the last section, we learned a bit about how to navigate the filesystem.
You probably saw some files when using the ls command in various directories.
In this section, we'll discuss different ways that you can use to view files.
In contrast to some operating systems, Linux and other Unix-like operating systems rely on plain text files for vast portions of the system.
The main way that we will view files is with the less command.
This is what we call a “pager”, because it allows us to scroll through pages of a file.
While the previous commands immediately executed and returned you to the command line, less is an application that will continue to run and occupy the screen until you exit.
We will open the /etc/services file, which is a configuration file that contains service information that the system knows about:
less /etc/services
The file will be opened in less, allowing you to see the portion of the document that fits in the area of the terminal window:
# Network services, Internet style
#
# Note that it is presently the policy of IANA to assign a single well-known
# port number for both TCP and UDP; hence, officially ports have two entries
# even if the protocol doesn't support UDP operations.
#
# Updated from http://www.iana.org/assignments/port-numbers and other
# sources like http://www.freebsd.org/cgi/cvsweb.cgi/src/etc/services .
# New ports will be added on request if they have been officially assigned
# by IANA and used in the real-world or are needed by a debian package.
# If you need a huge list of used numbers please install the nmap package.
tcpmux 1/tcp # TCP port service multiplexer
echo 7/tcp
.
.
.
To scroll, you can use the up and down arrow keys on your keyboard.
To page down one whole screens-worth of information, you can use either the space bar, the “Page Down” button on your keyboard, or the CTRL-f shortcut.
To scroll back up, you can use either the “Page Up” button, or the CTRL-b keyboard shortcut.
To search for some text in the document, you can type a forward slash “/” followed by the search term.
For instance, to search for “mail”, we would type:
/mail
This will search forward through the document and stop at the first result.
To get to another result, you can type the lower-case n key:
n
To move backwards to the previous result, use a capital N instead:
N
When you wish to exit the less program, you can type q to quit:
q
While we focused on the less tool in this section, there are many other ways of viewing a file that come in handy in certain circumstances.
The cat command displays a file's contents and returns you to the prompt immediately.
The head command, by default, shows the first 10 lines of a file.
Likewise, the tail command shows the last 10 lines by default.
These commands display file contents in a way that is useful for “piping” to other programs.
We will discuss this concept in a future guide.
Feel free to see how these commands display the /etc/services file differently.
File and Directory Manipulation
We learned in the last section how to view a file.
In this section, we'll demonstrate how to create and manipulate files and directories.
Create a File with “touch”
Many commands and programs can create files.
The most basic method of creating a file is with the touch command.
This will create an empty file using the name and location specified.
First, we should make sure we are in our home directory, since this is a location where we have permission to save files.
Then, we can create a file called file1 by typing:
cd
touch file1
Now, if we view the files in our directory, we can see our newly created file:
ls
file1
If we use this command on an existing file, the command simply updates the data our filesystem stores on the time when the file was last accessed and modified.
This won't have much use for us at the moment.
We can also create multiple files at the same time.
We can use absolute paths as well.
For instance, if our user account is called demo, we could type:
touch /home/demo/file2 /home/demo/file3
ls
file1 file2 file3
Create a Directory with “mkdir”
Similar to the touch command, the mkdir command allows us to create empty directories.
For instance, to create a directory within our home directory called test, we could type:
cd
mkdir test
We can make a directory within the test directory called example by typing:
mkdir test/example
For the above command to work, the test directory must already exist.
To tell mkdir that it should create any directories necessary to construct a given directory path, you can use the -p option.
This allows you to create nested directories in one step.
We can create a directory structure that looks like some/other/directories by typing:
mkdir -p some/other/directories
The command will make the some directory first, then it will create the other directory inside of that.
Finally it will create the directories directory within those two directories.
Moving and Renaming Files and Directories with “mv”
We can move a file to a new location using the mv command.
For instance, we can move file1 into the test directory by typing:
mv file1 test
For this command, we give all of the items that we wish to move, with the location to move them at the end.
We can move that file back to our home directory by using the special dot reference to refer to our current directory.
We should make sure we're in our home directory, and then execute the command:
cd
mv test/file1 .
This may seem unintuitive at first, but the mv command is also used to rename files and directories.
In essence, moving and renaming are both just adjusting the location and name for an existing item.
So to rename the test directory to testing, we could type:
mv test testing
Note: It is important to realize that your Linux system will not prevent you from certain destructive actions.
If you are renaming a file and choose a name that already exists, the previous file will be overwritten by the file you are moving.
There is no way to recover the previous file if you accidentally overwrite it.
Copying Files and Directories with “cp”
With the mv command, we could move or rename a file or directory, but we could not duplicate it.
The cp command can make a new copy of an existing item.
For instance, we can copy file3 to a new file called file4:
cp file3 file4
Unlike a mv operation, after which file3 would no longer exist, we now have both file3 and file4.
Note: As with the mv command, it is possible to overwrite a file if you are not careful about the filename you are using as the target of the operation.
For instance, if file4 already existed in the above example, its content would be completely replaced by the content of file3.
In order to copy directories, you must include the -r option to the command.
This stands for “recursive”, as it copies the directory, plus all of the directory's contents.
This option is necessary with directories, regardless of whether the directory is empty.
For instance, to copy the some directory structure to a new structure called again, we could type:
cp -r some again
Unlike with files, with which an existing destination would lead to an overwrite, if the target is an existing directory, the file or directory is copied into the target:
cp file1 again
This will create a new copy of file1 and place it inside of the again directory.
Removing Files and Directories with “rm” and “rmdir”
To delete a file, you can use the rm command.
Note: Be extremely careful when using any destructive command like rm.
There is no “undo” command for these actions so it is possible to accidentally destroy important files permanently.
To remove a regular file, just pass it to the rm command:
cd
rm file4
Likewise, to remove empty directories, we can use the rmdir command.
This will only succeed if there is nothing in the directory in question.
For instance, to remove the example directory within the testing directory, we can type:
rmdir testing/example
If you wish to remove a non-empty directory, you will have to use the rm command again.
This time, you will have to pass the -r option, which removes all of the directory's contents recursively, plus the directory itself.
For instance, to remove the again directory and everything within it, we can type:
rm -r again
Once again, it is worth reiterating that these are permanent actions.
Be entirely sure that the command you typed is the one that you wish to execute.
Editing Files
Currently, we know how to manipulate files as objects, but we have not learned how to actually edit them and add content to them.
The nano command is one of the simplest command-line Linux text editors, and is a great starting point for beginners.
It operates somewhat similarly to the less program discussed above, in that it occupies the entire terminal for the duration of its use.
The nano editor can open existing files, or create a file.
If you decide to create a new file, you can give it a name when you call the nano editor, or later on, when you wish to save your content.
We can open the file1 file for editing by typing:
cd
nano file1
The nano application will open the file (which is currently blank).
The interface looks something like this:
GNU nano 2.2.6 File: file1
[ Read 0 lines ]
^G Get Help ^O WriteOut ^R Read File ^Y Prev Page ^K Cut Text ^C Cur Pos
^X Exit ^J Justify ^W Where Is ^V Next Page ^U UnCut Text ^T To Spell
Along the top, we have the name of the application and the name of the file we are editing.
In the middle, the content of the file, currently blank, is displayed.
Along the bottom, we have a number of key combinations that indicate some basic controls for the editor.
For each of these, the ^ character means the CTRL key.
To get help from within the editor, type:
CTRL-G
When you are finished browsing the help, type CTRL-X to get back to your document.
Type in or modify any text you would like.
For this example, we'll just type these two sentences:
Hello there.
Here is some text.
To save our work, we can type:
CTRL-O
This is the letter “o”, not a zero.
It will ask you to confirm the name of the file you wish to save to:
File Name to Write: file1
^G Get Help M-D DOS Format M-A Append M-B Backup File
^C Cancel M-M Mac Format M-P Prepend
As you can see, the options at the bottom have also changed.
These are contextual, meaning they will change depending on what you are trying to do.
If file1 is still the file you wish to write to, hit “ENTER”.
If we make some additional changes and wish to save the file and exit the program, we will see a similar prompt.
Add a new line, and then try to exit the program by typing:
CTRL-X
If you have not saved after making your modification, you will be asked whether you wish to save the modifications you made:
Save modified buffer (ANSWERING "No" WILL DESTROY CHANGES) ?
Y Yes
N No ^C Cancel
You can type “Y” to save your changes, “N” to discard your changes and exit, or “CTRL-C” to cancel the exit operation.
If you choose to save, you will be given the same file prompt that you received before, confirming that you want to save the changes to the same file.
Press ENTER to save the file and exit the editor.
You can see the contents of the file you created using either the cat program to display the contents, or the less program to open the file for viewing.
After viewing with less, remember that you should hit q to get back to the terminal.
less file1
Hello there.
Here is some text.
Another line.
Another editor that you may see referenced in certain guides is vim or vi.
This is a more advanced editor that is very powerful, but comes with a very steep learning curve.
If you are ever told to use vim or vi, feel free to use nano instead.
If you wish to learn how to use vim, read our guide to getting started with vim.
Conclusion
By now, you should have a basic understanding of how to get around your Linux server and how to see the files and directories available.
You should also know some basic file manipulation commands that will allow you to view, copy, move, or delete files.
Finally, you should be comfortable with some basic editing using the nano text editor.
With these few skills, you should be able to continue on with other guides and learn how to get the most out of your server.
In our next guide, we will discuss how to view and understand Linux permissions.
An Introduction to Linux Permissions
Introduction
Linux is a multi-user OS that is based on the Unix concepts of file ownership and permissions to provide security at the file system level.
If you are planning to improve your Linux skills, it is essential that you have a decent understanding of how ownership and permissions work.
There are many intricacies when dealing with file ownership and permissions, but we will try our best to distill the concepts down to the details that are necessary for a foundational understanding of how they work.
In this tutorial, we will cover how to view and understand Linux ownership and permissions.
If you are looking for a tutorial on how to modify permissions, check out this guide: Linux Permissions Basics and How to Use Umask on a VPS
Prerequisites
Make sure you understand the concepts covered in the prior tutorials in this series:
Access to a Linux server is not strictly necessary to follow this tutorial, but having one to use will let you get some first-hand experience.
If you want to set one up, check out this link for help.
About Users
As mentioned in the introduction, Linux is a multi-user system.
We must understand the basics of Linux users and groups before we can talk about ownership and permissions, because they are the entities that the ownership and permissions apply to.
Let's get started with the basics of what users are.
In Linux, there are two types of users: system users and regular users.
Traditionally, system users are used to run non-interactive or background processes on a system, while regular users used for logging in and running processes interactively.
When you first log in to a Linux system, you may notice that it starts out with many system users that run the services that the OS depends on–this is completely normal.
An easy way to view all of the users on a system is to look at the contents of the /etc/passwd file.
Each line in this file contains information about a single user, starting with its user name (the name before the first :).
Print the passwd file with this command:
cat /etc/passwd
Superuser
In addition to the two user types, there is the superuser, or root user, that has the ability to override any file ownership and permission restrictions.
In practice, this means that the superuser has the rights to access anything on its own server.
This user is used to make system-wide changes, and must be kept secure.
It is also possible to configure other user accounts with the ability to assume “superuser rights”.
In fact, creating a normal user that has sudo privileges for system administration tasks is considered to be best practice.
About Groups
Groups are collections of zero or more users.
A user belongs to a default group, and can also be a member of any of the other groups on a server.
An easy way to view all the groups and their members is to look in the /etc/group file on a server.
We won't cover group management in this article, but you can run this command if you are curious about your groups:
cat /etc/group
Now that you know what users and groups are, let's talk about file ownership and permissions!
Viewing Ownership and Permissions
In Linux, each and every file is owned by a single user and a single group, and has its own access permissions.
Let's look at how to view the ownership and permissions of a file.
The most common way to view the permissions of a file is to use ls with the long listing option, e.g.
ls -l myfile.
If you want to view the permissions of all of the files in your current directory, run the command without an argument, like this:
ls -l
Hint: If you are in an empty home directory, and you haven't created any files to view yet, you can follow along by listing the contents of the /etc directory by running this command: ls -l /etc
Here is an example screenshot of what the output might look like, with labels of each column of output:
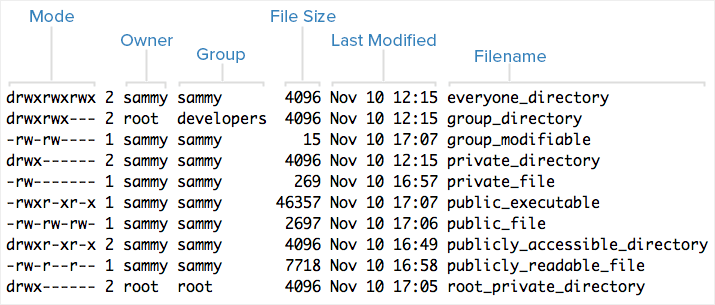 Note that each file's mode (which contains permissions), owner, group, and name are listed.
Aside from the Mode column, this listing is fairly easy to understand.
To help explain what all of those letters and hyphens mean, let's break down the Mode column into its components.
Note that each file's mode (which contains permissions), owner, group, and name are listed.
Aside from the Mode column, this listing is fairly easy to understand.
To help explain what all of those letters and hyphens mean, let's break down the Mode column into its components.
Understanding Mode
To help explain what all the groupings and letters mean, take a look at this closeup of the mode of the first file in the example above:

File Type
In Linux, there are two basic types of files: normal and special.
The file type is indicated by the first character of the mode of a file–in this guide, we refer to this as the file type field.
Normal files can be identified by files with a hyphen (-) in their file type fields.
Normal files are just plain files that can contain data.
They are called normal, or regular, files to distinguish them from special files.
Special files can be identified by files that have a non-hyphen character, such as a letter, in their file type fields, and are handled by the OS differently than normal files.
The character that appears in the file type field indicates the kind of special file a particular file is.
For example, a directory, which is the most common kind of special file, is identified by the d character that appears in its file type field (like in the previous screenshot).
There are several other kinds of special files but they are not essential what we are learning here.
Permissions Classes
From the diagram, we know that Mode column indicates the file type, followed by three triads, or classes, of permissions: user (owner), group, and other.
The order of the classes is consistent across all Linux distributions.
Let's look at which users belong to each permissions class:
- User: The owner of a file belongs to this class
- Group: The members of the file's group belong to this class
- Other: Any users that are not part of the user or group classes belong to this class.
Reading Symbolic Permissions
The next thing to pay attention to are the sets of three characters, or triads, as they denote the permissions, in symbolic form, that each class has for a given file.
In each triad, read, write, and execute permissions are represented in the following way:
- Read: Indicated by an r in the first position
- Write: Indicated by a w in the second position
- Execute: Indicated by an x in the third position.
In some special cases, there may be a different character here
A hyphen (-) in the place of one of these characters indicates that the respective permission is not available for the respective class.
For example, if the group triad for a file is r--, the file is “read-only” to the group that is associated with the file.
Understanding Read, Write, Execute
Now that you know how to read which permissions of a file, you probably want to know what each of the permissions actually allow users to do.
We will explain each permission individually, but keep in mind that they are often used in combination with each other to allow for meaningful access to files and directories.
Here is a quick breakdown of the access that the three basic permission types grant a user.
Read
For a normal file, read permission allows a user to view the contents of the file.
For a directory, read permission allows a user to view the names of the file in the directory.
Write
For a normal file, write permission allows a user to modify and delete the file.
For a directory, write permission allows a user to delete the directory, modify its contents (create, delete, and rename files in it), and modify the contents of files that the user can read.
Execute
For a normal file, execute permission allows a user to execute a file (the user must also have read permission).
As such, execute permissions must be set for executable programs and shell scripts before a user can run them.
For a directory, execute permission allows a user to access, or traverse, into (i.e.
cd) and access metadata about files in the directory (the information that is listed in an ls -l).
Examples of Modes (and Permissions)
Now that know how to read the mode of a file, and understand the meaning of each permission, we will present a few examples of common modes, with brief explanations, to bring the concepts together.
- -rw-------: A file that is only accessible by its owner
- -rwxr-xr-x: A file that is executable by every user on the system.
A “world-executable” file
- -rw-rw-rw-: A file that is open to modification by every user on the system.
A “world-writable” file
- drwxr-xr-x: A directory that every user on the system can read and access
- drwxrwx---: A directory that is modifiable (including its contents) by its owner and group
- drwxr-x---: A directory that is accessible by its group
As you may have noticed, the owner of a file usually enjoys the most permissions, when compared to the other two classes.
Typically, you will see that the group and other classes only have a subset of the owner's permissions (equivalent or less).
This makes sense because files should only be accessible to users who need access to them for a particular reason.
Another thing to note is that even though many permissions combinations are possible, only certain ones make sense in most situations.
For example, write or execute access is almost always accompanied by read access, since it's hard to modify, and impossible to execute, something you can't read.
Modifying Ownership and Permissions
To keep this tutorial simple, we will not cover how to modify file ownership and permissions here.
To learn how to use chown, chgrp, and chmod to accomplish these tasks, refer to this guide: Linux Permissions Basics and How to Use Umask on a VPS.
Conclusion
You should now have a good understanding of how ownership and permissions work in Linux.
If you would like to learn more about Linux basics, it is highly recommended that you read the next tutorial in this series:
An Introduction to Linux I/O Redirection
Introduction
The redirection capabilities built into Linux provide you with a robust set of tools used to make all sorts of tasks easier to accomplish.
Whether you're writing complex software or performing file management through the command line, knowing how to manipulate the different I/O streams in your environment will greatly increase your productivity.
Streams
Input and output in the Linux environment is distributed across three streams.
These streams are:
- standard input (stdin)
- standard output (stdout)
- standard error (stderr)
The streams are also numbered:
- stdin (0)
- stdout (1)
- stderr (2)
During standard interactions between the user and the terminal, standard input is transmitted through the user's keyboard.
Standard output and standard error are displayed on the user's terminal as text.
Collectively, the three streams are referred to as the standard streams.
Standard Input
The standard input stream typically carries data from a user to a program.
Programs that expect standard input usually receive input from a device, such as a keyboard.
Standard input is terminated by reaching EOF (end-of-file).
As described by its name, EOF indicates that there is no more data to be read.
To see standard input in action, run the cat program.
Cat stands for concatenate, which means to link or combine something.
It is commonly used to combine the contents of two files.
When run on its own, cat opens a looping prompt.
cat
After opening cat, type a series of numbers as it is running.
1
2
3
ctrl-d
When you type a number and press enter, you are sending standard input to the running cat program, which is expecting said input.
In turn, the cat program is sending your input back to the terminal display as standard output.
EOF can be input by the user by pressing ctrl-d.
After the cat program receives EOF, it stops.
Standard Output
Standard output writes the data that is generated by a program.
When the standard output stream is not redirected, it will output text to the terminal.
Try the following example:
echo Sent to the terminal through standard output
When used without any additional options, the echo command displays any argument that is passed to it on the command line.
An argument is something that is received by a program.
Run echo without any arguments:
echo
It will return an empty line, since there are no arguments.
Standard Error
Standard error writes the errors generated by a program that has failed at some point in its execution.
Like standard output, the default destination for this stream is the terminal display.
When a program's standard error stream is piped to a second program, the piped data (consisting of program errors) is simultaneously sent to the terminal as well.
Let's see a basic example of standard error using the ls command.
ls lists a directory's contents.
When run without an argument, ls lists the contents within the current directory.
If ls is run with a directory as an argument, it will list the contents of the provided directory.
ls %
Since % is not an existing directory, this will send the following text to standard error:
ls: cannot access %: No such file or directory
Stream Redirection
Linux includes redirection commands for each stream.
These commands write standard output to a file.
If a non-existent file is targetted (either by a single-bracket or double-bracket command), a new file with that name will be created prior to writing.
Commands with a single bracket overwrite the destination's existing contents.
Overwrite
- > - standard output
- < - standard input
- 2> - standard error
Commands with a double bracket do not overwrite the destination's existing contents.
Append
- >> - standard output
- << - standard input
- 2>> - standard error
Let's see an example:
cat > write_to_me.txt
a
b
c
ctrl-d
Here, cat is being used to write to a file, which is created as a result of the loop.
View the contents of writetome.txt using cat:
cat write_to_me.txt
It should have the following contents:
a
b
c
Redirect cat to writetome.txt again, and enter three numbers.
cat > write_to_me.txt
1
2
3
ctrl-d
When you use cat to view writetome.txt, you will see the following:
1
2
3
The prior contents are no longer there, as the file was overwritten by the single-bracket command.
Do one more cat redirection, this time using double brackets:
cat >> write_to_me.txt
a
b
c
ctrl-d
Open writetome.txt again, and you will see this:
1
2
3
a
b
c
The file now contains text from both uses of cat, as the second one did not override the first one.
Pipes
Pipes are used to redirect a stream from one program to another.
When a program's standard output is sent to another through a pipe, the first program's data, which is received by the second program, will not be displayed on the terminal.
Only the filtered data returned by the second program will be displayed.
The Linux pipe is represented by a vertical bar.
*|*
An example of a command using a pipe:
ls | less
This takes the output of ls, which displays the contents of your current directory, and pipes it to the less program.
less displays the data sent to it one line at a time.
ls normally displays directory contents across multiple rows.
When you run it through less, each entry is placed on a new line.
Though the functionality of the pipe may appear to be similar to that of > and >> (standard output redirect), the distinction is that pipes redirect data from one command to another, while > and >> are used to redirect exclusively to files.
Filters
Filters are commands that alter piped redirection and output.
Note that filter commands are also standard Linux commands that can be used without pipes.
- find - Find returns files with filenames that match the argument passed to find.
- grep - Grep returns text that matches the string pattern passed to grep.
- tee - Tee redirects standard input to both standard output and one or more files.
- tr - tr finds-and-replaces one string with another.
- wc - wc counts characters, lines, and words.
Examples
Now that you have been introduced to redirection, piping, and basic filters, let's look at some basic redirection patterns and examples.
command > file
This pattern redirects the standard output of a command to a file.
ls ~ > root_dir_contents.txt
The command above passes the contents of your system's root directory as standard output, and writes the output to a file named rootdircontents.txt.
It will delete any prior contents in the file, as it is a single-bracket command.
command > /dev/null
/dev/null is a special file that is used to trash any data that is redirected to it.
It is used to discard standard output that is not needed, and that might otherwise interfere with the functionality of a command or a script.
Any output that is sent to /dev/null is discarded.
In the future, you may find the practice of redirecting standard output and standard error to /dev/null when writing shell scripts.
ls > /dev/null
This command discards the standard output stream returned from the command ls by passing it to /dev/null.
command 2> file
This pattern redirects the standard error stream of a command to a file, overwriting existing contents.
mkdir '' 2> mkdir_log.txt
This redirects the error raised by the invalid directory name “, and writes it to log.txt.
Note that the error is still sent to the terminal and displayed as text.
command >> file
This pattern redirects the standard output of a command to a file without overwriting the file's existing contents.
echo Written to a new file > data.txt
echo Appended to an existing file's contents >> data.txt
This pair of commands first redirects the text inputted by the user through echo to a new file.
It then appends the text received by the second echo command to the existing file, without overwriting its contents.
command 2>> file
The pattern above redirects the standard error stream of a command to a file without overwriting the file's existing contents.
This pattern is useful for creating error logs for a program or service, as the log file will not have its previous content wiped each time the file is written to.
find '' 2> stderr_log.txt
wc '' 2>> stderr_log.txt
The above command redirects the error message caused by an invalid find argument to a file named stderr_log.txt.
It then appends the error message caused by an invalid wc argument to the same file.
command | command
Redirects the standard output from the first command to the standard input of the second command.
find /var lib | grep deb
This command searches through /var and its subfolders for filenames and extensions that match the string deb, and returns the file paths for the files, with the matching portion in each path highlighted in red.
command | tee file
This pattern (which includes the tee command) redirects the standard output of the command to a file and overwrites its contents.
Then, it displays the redirected output in the terminal.
It creates a new file if the file does not already exist.
In the context of this pattern, tee is typically used to view a program's output while simultaneously saving it to a file.
wc /etc/magic | tee magic_count.txt
This pipes the counts for characters, lines, and words in the magic file (used by the Linux shell to determine file types) to the tee command, which then splits wc's output in two directions, and sends it to the terminal display and the magic_count.txt file.
For the tee command, imagine the letter T.
The bottom part of the letter is the initial data, and the top part is the data being split in two different directions (standard output and the terminal).
Multiple pipes can be used to redirect output across multiple commands and/or filters.
command | command | command >> file
This pattern predirects the standard output of the first command and filters it through the next two commands.
It then appends the final result to a file.
ls ~ | grep *tar | tr e E >> ls_log.txt
This begins by running ls in your root directory (~) and piping the result to the grep command.
In this case, grep returns a list of files containing tar in their filename or extension.
The results from grep are then piped to tr, which replaces occurrences of the letter e with E, since e is being passed as the first argument (the string to search for), and E is passed as the second argument (the string that replaces any matches for the first argument).
This final result is then appended to the file ls_log.txt, which is created if it does not already exist).
Conclusion
Learning how to use the redirection capabilities built into the Linux command line can be a bit daunting, but you are well on your way to mastering this skillset after completing this tutorial.
Now that you have seen the basics of how redirections and pipes work, you'll be able to begin your foray into the world of shell scripting, which makes frequent use of the programs and patterns highlighted in this guide.
If you would like to dig deeper into the commands that were introduced in this tutorial, you can do so with man command | less.
For example:
man tee | less
This will show you the full list of commands available for the tee program.
You can use this pattern to display information and usage options for any Linux command or program.
Googling for specific commands, or for something that you would like to do in the command line (e.g.
"delete all files in a directory that begin with an uppercase letter”) can also prove helpful when you need to accomplish a specific task using the command line.